Find Rob on Google+

‘Repairs & Servicing’

This is not just a blog of routine servicing, but also repairs and improvements

Vette032Web

Between 2012 and 2022 there wasn’t much to report apart from the annual service. I didn’t drive the car very much due to complications from failed back surgeries.

In  2018, for reliability, I replaced the original radiator with a new three core aluminium radiator. The original radiator was still OK but old and only 2 core.

In 2022 I began to hear a rumble from the diff and had it rebuilt by a local expert. Why it began to be noisy is a mystery because I’ve always looked after the car, never driven it harshly. The diff was full of oil of a reasonable colour. My best guess is that it was age combined with not being driven enough. I also had the aircon serviced, fitting a new dryer and evaporator, blocking up several air leaks in the system to make it more efficient and a new valve. I replaced a power window switch. I also replaced all 4 tyres.

Wed
25
Apr

This is not just a blog of routine servicing, but also repairs and improvements

engine-bay00083

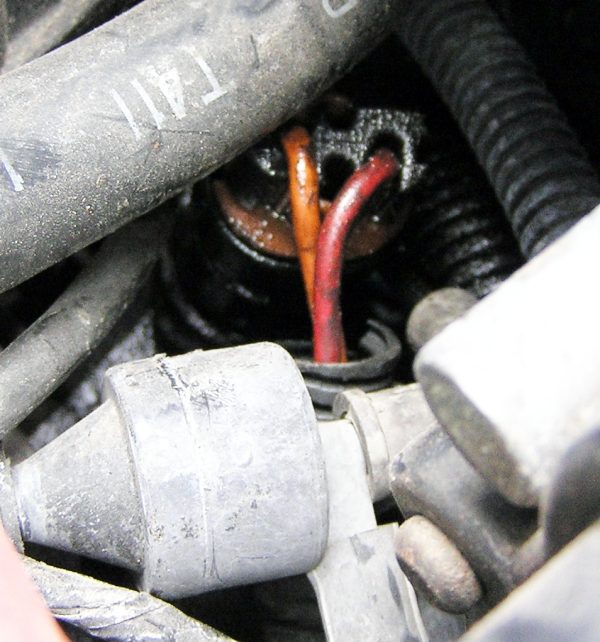
In 2011 there wasn’t much work to do, except that I finally traced the source of a small oil leak at the rear of the engine. The leak suddenly got much worse and it was easy to see that the plastic, electrical, part of the oil pressure sender was coming loose due to oil pressure.

This switch closes contacts above 4psi sending power to the fuel pump. The ECM also powers the fuel pump and this switch is only a backup. I removed the cap, ran the engine and watched the oil rise in the socket- confirming the switch was leaking.

Fitting a new one involved removing the distributor. I made up a list of instructions and it was all about the distributor. There was a single line mentioning the oil pressure switch – “Swap OP switch”

The OP sender is different on different years of C4’s. I took a photo of mine to make sure I got the right part.

I found one in Australia, Eagle Auto Parts Brisbane  Part # PS 167 was identical.


Here are the instructions in case it helps someone else –

Corvette – Replacing the oil pressure switch

Remove Distributor

Bump engine over until rotor points to front.

Disconnect 4 wire plug to dist body and the 2 wires to cap

Undo bolt on RH holding clamp and remove or slide clamp back so dizzy will lift out.

Note that the rotor will turn anti clockwise as dist is removed.

Make visual note –  how much and the  final position.

It’s worth marking the final position in case it gets nudged and for confirmation when replacing


Swap OP switch.


Drop distributor into hole starting with rotor pointing in direction it ended up with when you removed it.

If aligned with the correct tooth ( and you have not turned engine over while it was out ) it should return to the pointing forward  position. Sometimes takes a few goes if you are one tooth out !

Replace 4 wire and 2 wire plugs

TIMING – The ECM expects the dissy to be set at 6 degrees BTDC. To set the timing, the EST wire must be disconnected to stop the ECM adjusting the timing automatically.

There is a plug in the EST wire on LH side of car, near evaporator box –(converted to RH Drive Corvette) unplug it to stop automatic timing control

With the EST disconnected set the engine idling at 1000 rpm.

Don’t adjust the set screw on the throttle body, which has been set v accurately and is a complicated process. Either get someone to hold the throttle or wedge something like a feeler gauge, strips of beer can etc between the throttle and the throttle stop on the throttle body. Any steady rpm from 800-1400 will probably do.

Set the base timing to 6 degrees BTDC

Tighten the distributor clamp.

Reconnect EST plug.

Start engine, check oil pressure on dash.


Routine jobs involved an Oil and filter change, greasing all nipples, rotate the wheels and a general inspection.

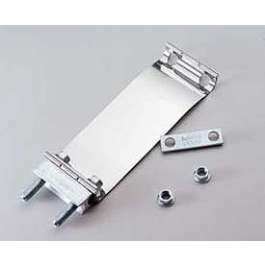
I also fitted a new  82C thermostat and a nifty centre exhaust clamp to replace the standard one where the bolts protruded down and sometimes scraped on speed bumps

Sat
13
Mar

This is not just a blog of routine servicing, but also repairs and improvements

engine-bay00083

Most jobs done this year were part of preparing the vette for the long 7 hour drive each way to the Charters Towers Car Show Weekend in June. Written up here – Charters Towers 2010

January

Radiator flushed and new O ring tank seals. New upper and lower Radiator Hoses
February

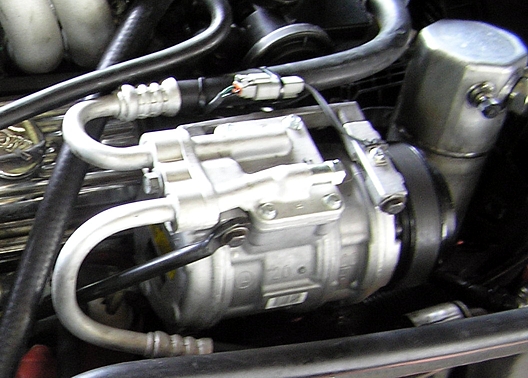
New Nippondenso Airconditioner compressor, dryer and orifice tube. Flushed twice.

The front seal failed after 6 months !!!! so here’s a WARNING – although the unit you buy may be new, it may have been sitting on a shelf for years. I had to have the unit reconditioned and the system regassed, which cost nearly as much as buying and installing the unit the first time!!!

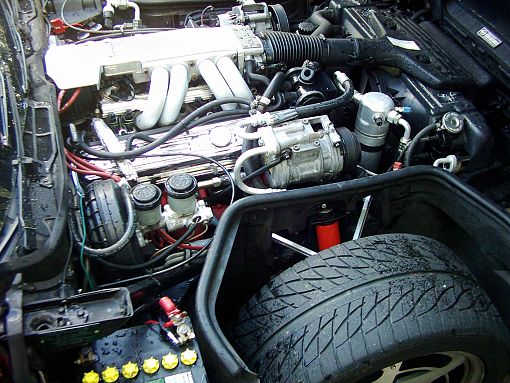
I also took the opportunity to have the pressure hose replaced because it is designed for R12 gas and is known to beocome porous over time with 134A gas. It’s the lower hose exiting the compressor in this picture.

Fitted a New Serpentine Belt

March

Replaced heater and oil cooler hoses.

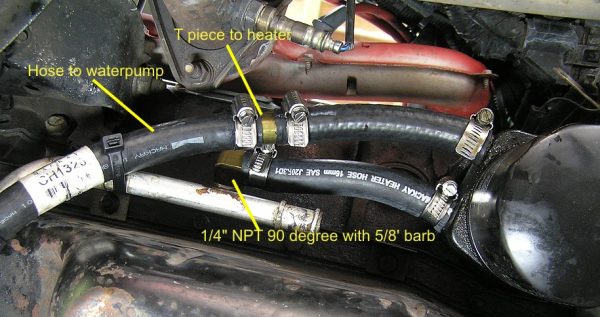
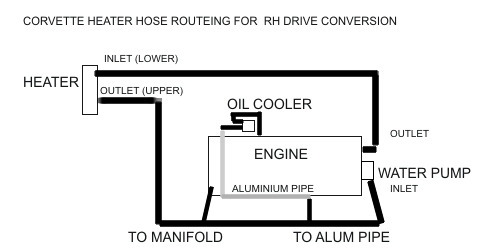
I discovered that during the right hand drive conversion, the oil cooler hose had been connected up the wrong way and was actually sending the hottest water to the oil cooler. The cool water outlet had been blocked off!!.

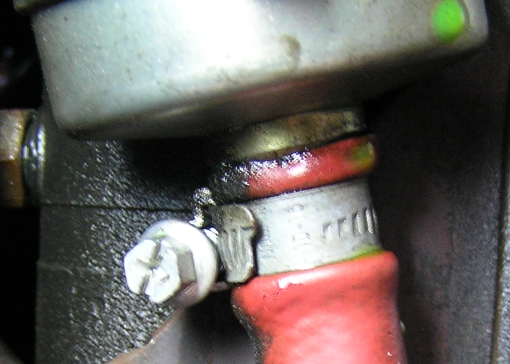
With great advice from NSW Corvette Guru, Rod, I replaced the blocked fitting with a brass L piece and led a hose straight to the oil cooler. The aluminium tube normally used to transfer coolant up to the water pump was not connected, possibly because it leaked, so I lead new hose up to the water pump.

This picture was taken looking straight up from the ground. On the right is the oil cooler – the brass L piece is labelled “1/4″ NPT 90 degree with 5/8″ barb”

Before routing the new hoses I checked the correct way to connect the cooling system with several people, including Rod, Ben, John Bondok and the Corvette Forum.

Here is the correct water flow chart for RIGHT HAND DRIVE converted C4’s –

Replaced power steering hoses. Although they were only 3.5 years old, they were leaking –

PS Hose

May

Replaced rear wheel bearings with genuine OEM bearings Full Info on How to here –Rear Wheel Bearings Instal

Replaced front shock absorbers with Monroe Sensa-trac.

Note: I fitted rear Monroe sensa- trac shock absorbers in 2008 and found they made the ride less harsh. The Nexen tyres fitted in 2009 also improved the ride quality although I think they are so soft you can feel the sidewalls give on hard cornering. At the vette tyre size of 275x40x17  I wouldn’t recommend them for high speed work, but I do recommend them for a less harsh ride.

June.

Because the reconditioned head was now 5 years old,   I had the head pressure tested to ensure that the head gasket was in top condition. As well as pressuring each cylinder, the entire system was pressurised and left overnight. All tests passed with flying colours.

Replaced the Sony CD player with a new one with MP3 input.

back to top

Mon
6
Apr

2009

Fitted new reduction style starter motor from late model C4’s – much lighter, easier on the battery and leaves more room for header exhaust pipes.

Fitted new Brake Master Cylinder, with brake bias spring.

Fitted four new Nexen tyres 275x40xZR17

Fitted New rear Disc Pads

New oil and oil filter

All four wheels aligned

Cleaned handbrake lever that was gunked up and fitted New Handbrake cable

New windscreen, frame blasted to bare metal and re sealed. New weatherstrip. New wiper blades. Windscreen coated with rainX.  http://robhealey.com.au/Corvette/tech-tips/windscreenwindshield-weatherstrip-replacement/

back to top

Mon
29
Dec

2008

May – replaced front disc pads with Brembo ones,(FM-1000m 0412). The EBC pads were hardly worn, but they only worked when extremely hot and were very poor when cold. The Bembro’s made a big difference.

July – Replaced all six universal joints. Although 5 of the old UJ’s looked OK, there was a noticeable difference with the new ones, and the car felt better, tighter.

Fitted new Monroe Sensatrac rear shock absorbers. I spent some time at the Corvette Forum, researching a good but soft shock absorber. The advice I got was excellent. Will upgrade the front shock absorbers too.

New Polyurethane rear suspension, well greased.

August – Fitted new waterpump, Flow Kooler 1688 from Summit Racing– 30% more flow up to 3500rpm.

Replaced the rear MAF relay because the warning light came on, this instantly fixed the problem.

Fitted quick fill fuel cap and two small louvres in tops of doors.

Fitted new Bosch style Altenator

Fitted New Internal Electric Fuel Pump.  I foiund a Holden one that was identical including the plug. Hi Pressure in tank for VN VS Commodore 6-8cyl. Repco # FPE-250A 

back to top

Thu
27
Dec

2007

All the repairs from the previous year, for the almost 5000km drive, resulted in a very smooth year for the Corvette. It ran very nicely and I did hardly anything to it.

June – fitted new EBC Greenstuff Disc pads all round and new front rotors

Oil and filter change.

back to top

Thu
28
Dec

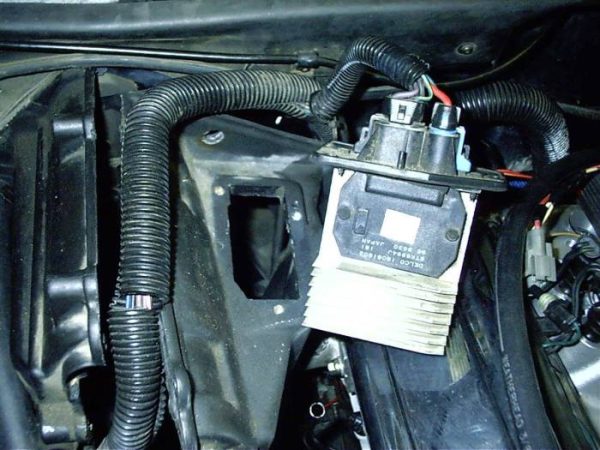
2006 January – fitted new module for the blower motor and Aircon.

Located and sealed several air leaks from the heater/aircon box and vents. Result was very good, with more cool air blowing from the vents. Digital thermometer in the air vent registered 6.7C – an excellent cold temperature.

Fitted new C68 Climate control Module.

April – fitted 2nd Hand ECM. Everything worked as normal, so I now have a spare to use for testing.

In preparation for a long drive to Brisbane and back, estimated at 4-5000kms (3000+miles), I tackled several jobs –

The hydraulic lifters were not adjusted properly after the heads were reconditioned last year. It took me nearly 3 hours to remove the right-hand rocker cover because of all the parts like the airconditioning compressor that were in the way, and because of my bad back I could only work for short periods, but within a few days I had the lifters adjusted properly and everything back together.
rhside

The next project was to remove some excess padding from the passenger seat side bolsters, which had been added in error when I had the seats recovered. That was an easy job.

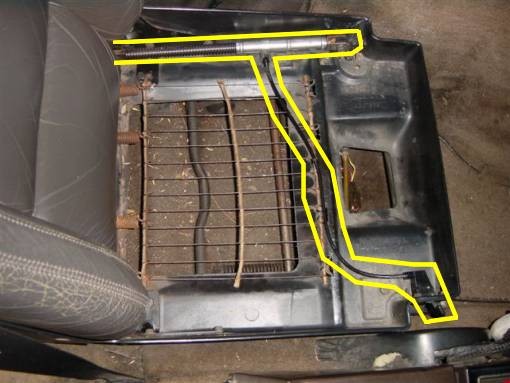
My back is partially fused together and very stiff. That, and my height, make it hard to get into the vette seat, so I have lowered the seat as much as I can. It’s so low that I was sitting on some of the adjusting machinery. The main culprit was the power reclining mechanism.

After some research I discovered that the manual reclining mechanism was less intrusive, so I ordered one of those from Vette2Vette in America.
 manrecline

For a long time the windscreen had been leaking in heavy rain. Eventually I found the source of the leak, between the glass and metal trim. I cleaned out the old silicone and resealed both sides.

A simple job was changing the oil and filter – or so I thought at the time, so I left it to last.

Another job on the list was fixing the door locks. On the passenger side the key would not operate the lock, and on the drivers side the electric solenoid was stiff, preventing the remote locking system from working.

Working inside the passenger door was tricky. The lock is at the top rear corner and mostly I had to work one handed and unsighted. It was while I was stretched and twisted trying to re-fit a circlip that I wrenched something in my spine which gave me a massive spasm and has been causing me pain ever since, despite many trips to the physiotherapist.

After losing the circlip in the door several times, I supaglued some thread onto it and of course it fitted straight on the next go!

 circlip

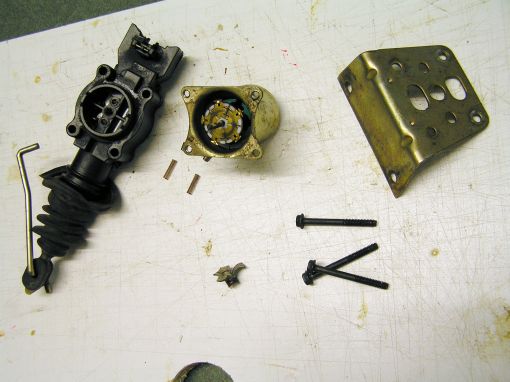
On the drivers side I drilled out the rivets holding the power door lock solenoid in place. Took the solenoid apart and discovered it’s a motor not a solenoid.


Cleaned it and the door lock up and bolted it back into place.
 solenoid

While working on the car one of the headlight lids came loose. I had it re-glued with expensive panel adhesive and I also attached a safety wire so that if one came loose again it wouldn’t fly off the car.

The steering rack had begun to leak, so I booked the car in with the steering rack specialists. What started out as a 2 day job turned into an 11 day saga. Firstly, because of the Right Hand Drive conversion, the rack is not a Corvette one and couldn’t be identified. The vette was converted by Corvette Queensland so I rang them to ask what the rack was from. They told me they didn’t know, but could sell me another one……. Hmmmmm.

Eventually the seals etc were sourced and the rack reconditioned. When they were refitting it I was told that the steering hadn’t been centered correctly during the conversion. I finally picked the vette up on a Sunday morning, with just a week to go before our planned holiday. The steering wheel was 1/3rd of a turn out and the specialists advised me that was because they had ‘re-engineered’ the rack so that it was centered. They also said I would have a tighter turning circle.

Cause of the rack leaking was traced to the rubber boots which were continually sucking in air and dirt as they compressed and decompressed. Pinks workshop did an excellent job of re-engineering the rack, fitting breathing tubes between the rubber boots, new rack ends, re routing new hoses etc.

I noticed that the indicator wouldn’t cancel on one side, so I dismantled the mechanism inside the steering column but found it was not adjustable. I then had a lot of trouble refitting everything, eventually I made a ‘pusher’ from the steering wheel puller and managed to squeeze the spring back down and fit the C clip.

I noticed some oil leaking from the new rack so took it back, but the workshop couldn’t find a leak, they did notice a blob of green coolant and suggested that maybe the coolant was leaking, so I hurriedly drove round to the radiator shop. Time was running out and if something needed fixing I only had one day, Friday, left to organise it.

They pressure tested the system and could find no problem. The leak must have been caused by oil residue because it hasn’t leaked since. I felt very confident that the coolant system would give no trouble after the pressure test.

Other jobs included hiding spare keys, replacing blown globes in the 3rd brake light, having a wheel alignment, re-set camber, wheels balanced.

Our plan was to leave early on Sunday morning, but while I was doing last minute jobs on Saturday afternoon, I discovered that the sump plug was loose and that the thread was partially stripped in the sump. I had the hole tapped one size oversize and was very pleased to see how thick the metal was in the sumpplug area.

The trip was a big success – see the Motoring Holiday 2006 page.

back to top
Fri
2
Dec

2005

January – Cleaned greased and re-adjusted wipers.

April – fitted new memcal to ECM changing coolant fan on/off settings to On 96C Off 91C. Also changed parameters to suit upgraded heated O2 sensor. The new chip made the car run better, crisper. There were four different base settings for 88 depending on which state and emissions legislation the car was bound for. Turns out I got a better setting!

May – fitted re-engineered Throttle Body by David Koldos – with sealed bearings on the spindle for smooth throttle operation.

New Chrome Rocker covers fitted.

August – Reconditioned Heads, new Felpro gaskets.

Injectors cleaned, tested and new O rings fitted.

Re-set base idle and adjusted TPS to 5.4volts.

Re-set fuel pressure to 43psi.

New Steering Wheel fitted – very nice!

New HVAC Controller – this controls the heater/Aircon blower etc

hvaccontrol

New Power window switches

Re-fitted repaired Courtesy Lights Dimmer module.

Fitted new contacts to starter motor.

Fitted reconditioned Brake Master Cylinder, full fluid flush.

back to top

Sun
26
Dec

2004

In January I replaced the old throttle cable and lubricated the cable and throttle body with Lithium spray grease. This made the throttle very smooth, but turned out to be a temporary 12 week fix. The spindle that turns the throttle blades wears an elongated hole in the aluminium throttle body and this jams from the intake of air, even at idle making the throttle stiff.

In February 2004 I had the transmission fully serviced and a Transgo Shift kit fitted which is designed to update the 700R4 transmission and extend it’s life.

Also in February I replaced the stock sealed beam headlights with new Cibie headlights with special extra white globes.

The engine had a full service in March with new Bosch FR7DCX plugs, BP Visco 5000 Oil and VO68 Valvoline filter.

Replaced the Coolant Fan sensor switch in the Aircon line – this switch turns the radiator/condensor fan on when certain conditions are met such as speed under 30mph and aircon on

coolant-fan-switch

May – I fitted new delrin bushes to the left hand pop up headlight.

I Fitted a switch to disable the hatch lights, so the hatch could be left open without draining battery

Reset the mechanical idle and the Throttle position sensor.

Re adjusted the fuel pressure to factory specs.

June – Had brand new radiator fitted as the old one had developed a crack. This made such an enormous difference to the cooling that I had to uprate the thermostat to a 180 degree one as the car was running too cool.

Fitted re-valved Bilstein shock absorbers for a smoother ride.

July – Had the 700R4 auto transmission rebuilt with heavy duty drive shell etc. Work done by the highly recommended Neil Maxwell, at Precise Automatics, Beenleigh.

December – fitted new s/s brake hoses and upgraded bias brake spring.

Wed
13
Oct

Transmission –

The 700R4 transmission is a fully automatic 4 speed transmission with a lock up torque convertor that, when engaged, locks the transmission completely and gives the same fuel economy and performance as a car with manual gears.

During the life of this transmission various updates were made correcting problems as they were discovered. With these updates the 700R4 is a strong and reliable transmission.

I think the Corvette auto transmission is brilliant. The shifts are so smooth it’s hard to know they’ve happened. The 4th gear is called overdrive, it’s a big gear designed for high speed although it will lock in with light throttle at a low 61kph. At this speed the revs of the big V8 motor drop to just above idle – incredible ! This gear is a real help to the fuel economy, compared to the previous C3 Corvette Stingray’s which only have a 3 speed auto transmission.

I discovered information about the update kits and decided that it would help keep the transmission healthy for a long life. I researched the various update kits and found one that was highly recommended by Corvette enthusiasts – the Transgo Shift Kit. This comes in 3 stages covering everything from normal street driving to drag racing with high horsepower engines. I didn’t want to loose the super smooth shifts so I had the normal street driving kit – SK 700 fitted at the next transmission service in March 2004.

Dave at GTS, 145 Scott St Cairns fitted the kit and gave the entire transmission a service, including inspecting U joints etc. There was an instant ‘seat of the pants’ feeling of improvement when I drove away afterwards. Hard to explain, the shifts are still super smooth but also firmer. I was very happy.

Unfortunately during the next few months the transmission began to show signs of some internal damage. I decided to have the gearbox completely rebuilt by a recognised expert on these transmissions – Neil Maxwell of Precise Automatics, Beenleigh, Qld.

I sent my Corvette down to him by road transport and he did a full recondition on the transmission, including installing a heavy duty drive shell, rebuilt pump, etc and set the valving up so that the gearbox shifted smoothly at low revs and firmly at high revs.

Neil said the new transmission was ‘better than out of the factory’ and should last a long time

back to top